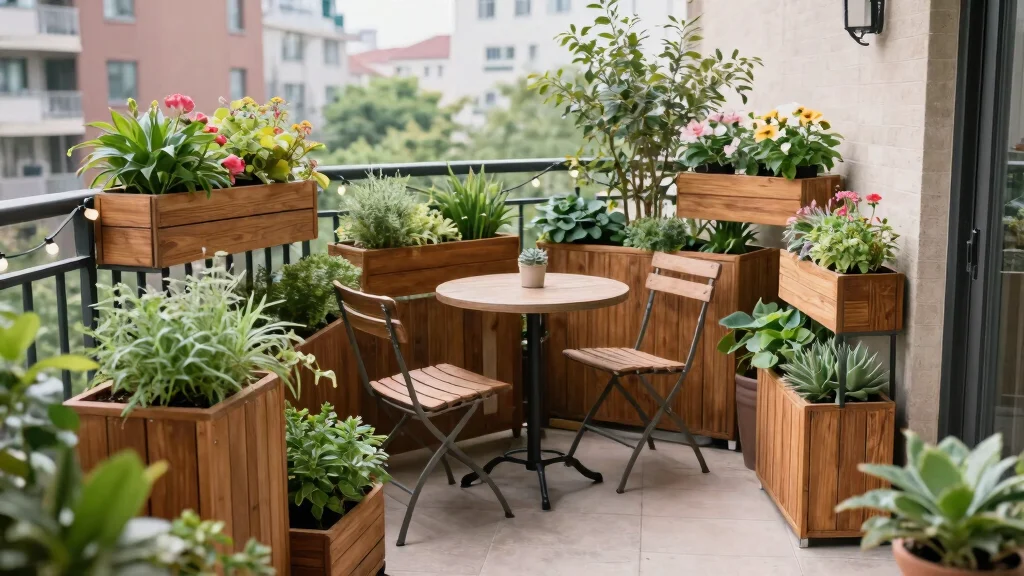
Creating a beautiful garden in an urban space can feel like a challenge. Limited room means you often have to think outside the box, or rather, inside a box! That’s why I created this post on 14 planter box plans that will help you transform your small outdoor area into a lush retreat. Whether you’re looking to grow herbs, flowers, or small vegetables, these DIY planter boxes allow you to cultivate your green thumb without taking up too much space.
If you love gardening but feel restricted by your urban environment, this guide is just for you. You’ll find designs that cater to all skill levels, from beginners to pros. Each plan is not just functional; they also add a touch of charm to your outdoor decor. Plus, they’re made from sustainable materials, making your gardening journey even more fulfilling.
With this list, you’ll get access to a variety of planter box ideas that are creative, sustainable, and easy to build. Each design comes with its own unique flair, allowing you to express your personality while growing your favorite plants. Let’s dig into these exciting projects that will breathe life into your small space!
Key Takeaways
– Diverse Designs: This guide presents 14 unique planter box plans, ranging from vertical options to tiered designs, perfect for maximizing your gardening space.
– DIY Instructions: Each plan includes easy-to-follow steps, making it accessible for beginners and seasoned DIYers alike.
– Sustainable Choices: Many designs utilize recycled materials, such as pallets and tires, promoting eco-friendly gardening solutions.
– Aesthetic Appeal: The planter boxes not only serve a functional purpose but also enhance your outdoor decor with their creative styles.
– Space Efficiency: These planter box plans are specifically tailored for small urban spaces, allowing you to grow a variety of plants without crowding your area.
1. The Simple Vertical Planter
Embrace the beauty of vertical gardening with the simple vertical planter. This design is perfect for those with limited space, allowing you to cultivate a variety of plants without crowding your area. Using durable cedar wood not only enhances its natural resistance to rot but also adds a warm, rustic charm. The thoughtful slat design ensures that water drains well and air circulates freely, promoting healthy growth. Whether you paint it in a vibrant hue or keep it natural, it fits seamlessly in any garden or balcony setting, making it ideal for herbs, flowers, or even cherry tomatoes. Position it against a wall for extra stability and visual appeal.
To make the most of this vertical planter, consider sourcing affordable cedar wood from local suppliers or online marketplaces. If you’re on a budget, you can also repurpose wood from old furniture. This project connects you to broader trends in sustainable gardening while providing emotional satisfaction as you nurture your plants.
Consider these tips to maximize your vertical planter’s potential:
– Pair cedar wood with a light-colored outdoor sealant for added longevity
– Install it with brackets for extra support against wind
– Use lightweight potting soil to ease the planter’s weight
– Incorporate colorful flowers and fragrant herbs for a sensory experience
This vertical planter not only adds dimension to your garden but also enhances the overall aesthetic with its natural textures and materials.
2. The Tiered Planter Box
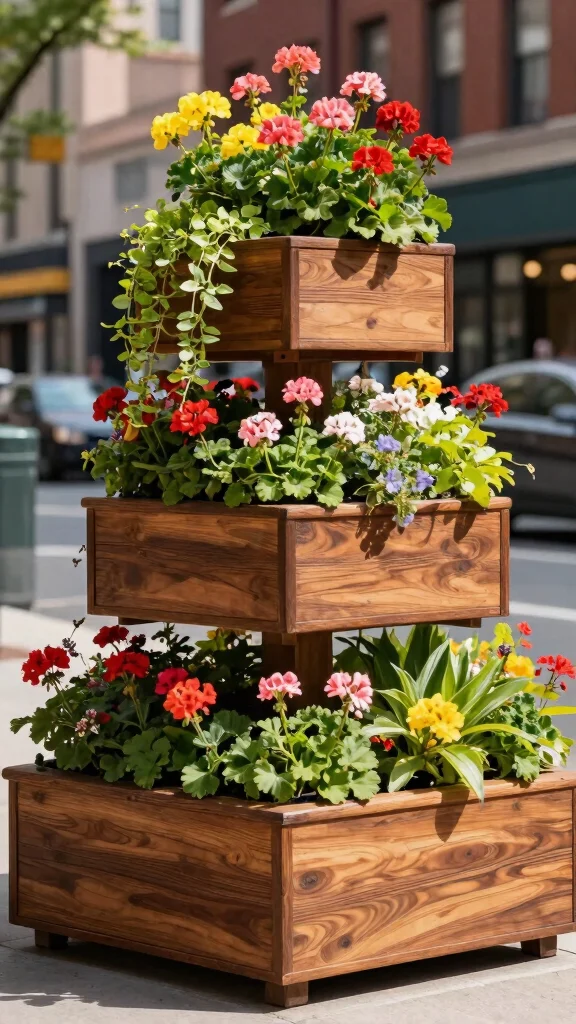
Transform your outdoor space with a tiered planter box that creates captivating levels for your plants. This design adds depth and visual interest, making it a stunning focal point in your garden or patio. By mixing rustic and modern wood finishes, you can elevate its charm and create a stylish display. Start by building a sturdy foundation that can support the soil and plants, ensuring a lasting and practical feature. The tiered structure not only maximizes planting space but also allows cascading plants like ivy to soften urban edges beautifully.
When implementing this design, consider using pressure-treated lumber for durability, which is often available at home improvement stores. To make it budget-friendly, look for reclaimed wood or second-hand materials. This tiered planter aligns with current trends in vertical gardening, allowing you to embrace nature while enhancing your outdoor living space.
Here are some actionable steps to create your own tiered planter:
– Install drainage holes in each tier for healthy roots
– Fill each tier with nutrient-rich soil for optimal growth
– Pair with colorful trailing plants for a lush effect
– Arrange it in a sunny spot for maximum light exposure
This tiered planter box not only maximizes your planting area but also serves as a beautiful display, enhancing the overall ambiance of your outdoor space.
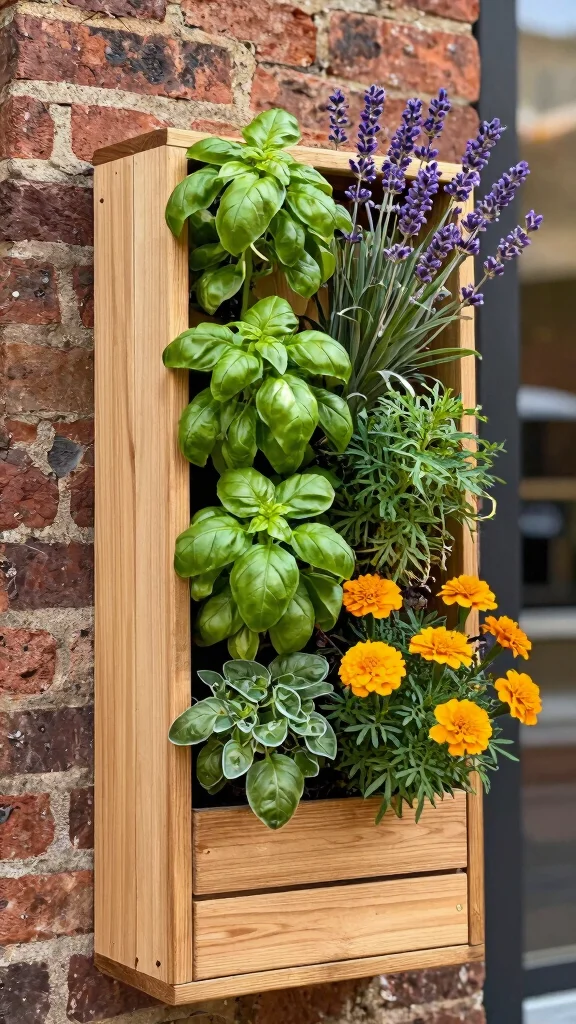
3. The Wall-Mounted Planter

Maximize your gardening potential with a chic wall-mounted planter that brings life to any vertical space. Perfect for small gardens or balconies, this design allows you to create a stunning visual display while saving floor space. Using reclaimed wood can add an eco-friendly touch, making each piece unique and inviting. You can arrange the pots in a playful, asymmetrical pattern for a modern look or opt for a symmetrical layout for a more classic vibe. Ideal for succulents, herbs, or small flowering plants, this design encourages creativity and personalization in your gardening efforts.
To implement this wall-mounted planter, consider sourcing reclaimed wood from local salvage yards for a sustainable option. If you’re on a budget, you can also repurpose old shelves or containers. This project reflects broader trends towards vertical gardening and sustainable living, allowing you to enjoy the satisfaction of growing your own plants.
Here are some ideas to create your wall-mounted planter:
– Use strong mounting brackets to ensure stability
– Fill pots with a mix of colorful herbs and flowers
– Incorporate drip trays to catch excess water
– Position in a sunny area for optimal growth
This charming wall-mounted planter not only enhances your gardening experience but also adds a touch of elegance and texture to your outdoor decor.
Difficulty Rating & Requirements
Overall Difficulty Rating: Medium
Building a planter box can be moderately challenging, particularly for those who haven’t tackled woodworking projects before. Depending on your chosen design, it may require some advanced skills such as measuring, cutting, and assembling different materials. This project is suitable for DIY enthusiasts with a bit of experience or those willing to learn as they go.
Time Estimate:
⏱ Estimated time: 4-8 hours
Here’s a breakdown of the phases:
– Planning and design: 1-2 hours to choose your planter type and gather materials.
– Cutting and assembling: 2-4 hours depending on complexity, such as a tiered or wall-mounted planter.
– Finishing touches: 1-2 hours for painting, staining, or sealing the wood, if desired.
Skill Requirements:
– Required skills: Basic woodworking, measuring, cutting, and assembly
– Beginner-friendly: No, but it can be learned with patience. Beginners can tackle simple designs like the simple vertical planter or pallet planters, while more complex designs like the tiered planter may require more experience.
– Skills that can be learned: Basic wood cutting and assembly techniques can be learned easily. However, skills such as precise measurements and advanced finishing techniques may need experience or guidance.
Tools & Materials Needed:
🧰 Essential items checklist:
– Wood planks (treated or untreated, required): Depending on your design, ensure you have enough planks cut to the right sizes.
– Saw (required): A hand saw or power saw for cutting wood.
– Drill and screws (required): For assembling the pieces securely.
– Measuring tape (required): To ensure accuracy in cuts and assembly.
– Wood glue (optional): For additional stability, though screws usually suffice.
– Paint or wood stain (optional): To customize and protect your planter.
– Sandpaper (optional): For smoothing edges and surfaces.
– Level (optional): To ensure your planter sits evenly.
Step-by-Step Overview:
1. Planning and Design (1-2 hours): Choose your planter box style and gather all necessary materials. Sketch out dimensions based on the space you have.
2. Cutting Wood (1-2 hours): Measure and cut your wood pieces according to your design. Ensure you double-check measurements for accuracy.
3. Assembly (1-2 hours): Start building by following your plan. Secure pieces with screws and wood glue where necessary.
4. Finishing (1-2 hours): Sand any rough edges to prevent splinters. Apply paint or stain for aesthetics and protection against weather elements.
5. Final Setup (30 mins): Once dry, place your planter in its designated spot and fill it with soil and plants.
Cost Comparison: Professional vs DIY:
Hiring a professional to create a custom planter box can range from $200 to $800 or more, depending on materials and design complexity. In contrast, creating your own planter box can cost between $50 to $150, depending on the materials you choose. If you enjoy hands-on projects and want to save money, DIY can be a rewarding choice. If you’re short on time or prefer a polished result without the effort, hiring a professional might be the way to go.
4. The Ladder Planter

Elevate your gardening experience with a ladder planter that brings a playful twist to vertical gardening. This design not only utilizes vertical space effectively but also serves as a charming decorative piece in your garden. By leaning a wooden ladder against a wall or fence, you create a delightful display where each rung can host different plants, from herbs to colorful flowers. Trailing vines can beautifully drape over the edges, adding to the overall aesthetic while allowing each plant to benefit from varied sunlight exposure.
To create this ladder planter, look for a sturdy wooden ladder at thrift stores or garage sales. If you want to enhance its look, consider painting or staining it to match your outdoor decor. This project connects with current design trends that focus on upcycling and maximizing space, all while fostering a love for gardening.
Consider these practical steps for your ladder planter:
– Secure pots or crates to each rung for planting
– Arrange plants by their sunlight needs for optimal growth
– Use lightweight containers to maintain balance
– Incorporate a variety of textures and colors for visual interest
This ladder planter adds a unique touch to your garden while enhancing the overall design with its charming structure and vibrant greenery.
Turn a simple ladder into a thriving vertical garden—no fancy tools required. Each rung hosts herbs, flowers, or small veggies, expanding your planter box plans in tight spaces. Practical, charming, and easy to build, it packs wow while saving space.
5. The Pallet Planter
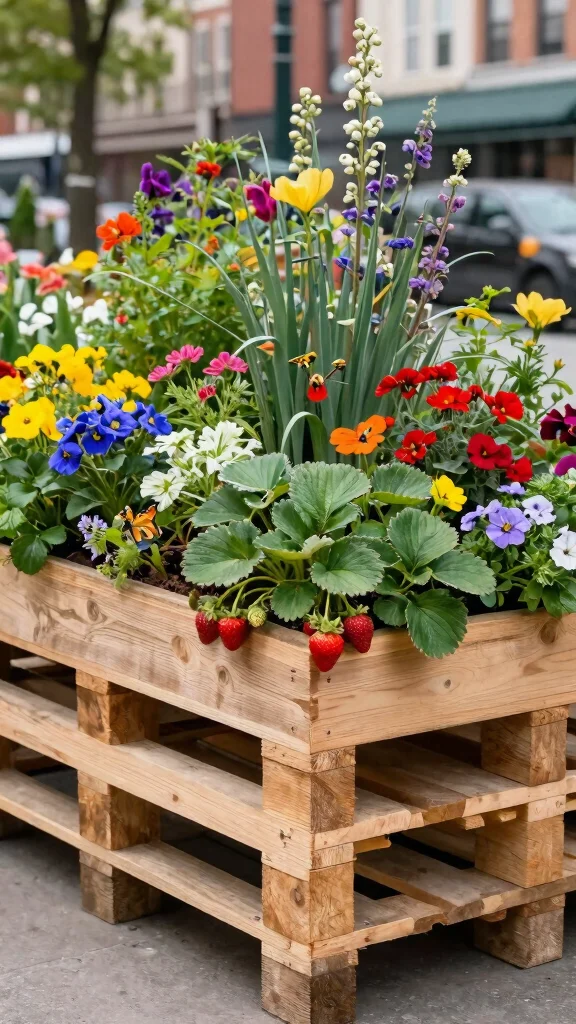
Embrace sustainability with a pallet planter that adds rustic charm to your garden. Repurposing pallets is not only trendy but also allows you to create a unique planting space filled with diverse greenery. Simply find a sturdy, clean pallet and sand it down to eliminate any splinters. You can lay it flat for a raised bed or prop it upright against a wall for a vertical garden. This design works beautifully for a variety of plants, such as herbs, strawberries, or ornamental flowers, creating a delightful display.
To implement this pallet planter, search for free or low-cost pallets from local businesses or online marketplaces. This eco-friendly project ties into broader trends of recycling and sustainable gardening practices, allowing you to cultivate plants while reducing waste.
Here’s how to create your pallet planter:
– Staple landscape fabric to the back for soil retention
– Position the pallet flat or upright based on your preference
– Fill openings with quality soil and plant a mix of greenery
– Water regularly and watch your garden flourish
This pallet planter not only offers a rustic aesthetic but also enhances the overall texture and character of your outdoor space.
6. The Recycled Tire Planter
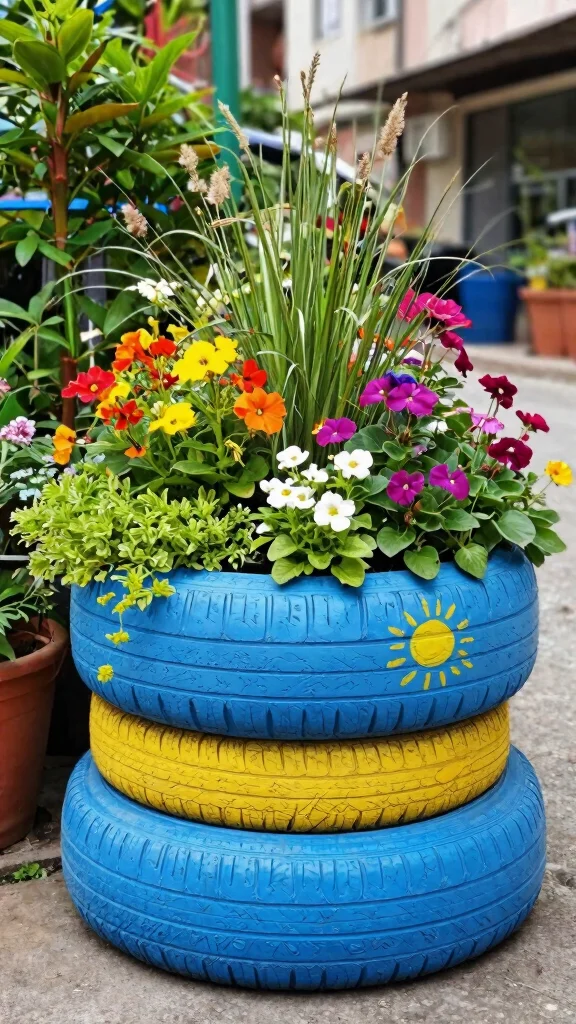
For a quirky and eco-friendly gardening option, consider transforming recycled tires into unique planters. These versatile containers can be painted in bright colors or left in their natural state for an industrial vibe. By cutting the tire in half or stacking them, you create an eye-catching design that adds character to your garden. Fill them with soil and plant vibrant flowers or herbs, creating an upcycled planter that not only benefits the environment but also adds personality to your space.
To create this fun planter, source old tires from local garages or recycling centers. If desired, a splash of outdoor paint can enhance their visual appeal. This project aligns with the growing trend of upcycling, allowing you to express creativity while making a positive environmental impact.
Here are some practical steps for your recycled tire planter:
– Clean the tires thoroughly to remove any residue
– Paint the exterior for added color and personality
– Fill with soil and arrange your plants creatively
– Stack multiple tires for added height and interest
This eye-catching tire planter not only adds a whimsical touch to your garden but also enhances the overall aesthetic with its vibrant colors and unique design.
7. The Concrete Block Planter
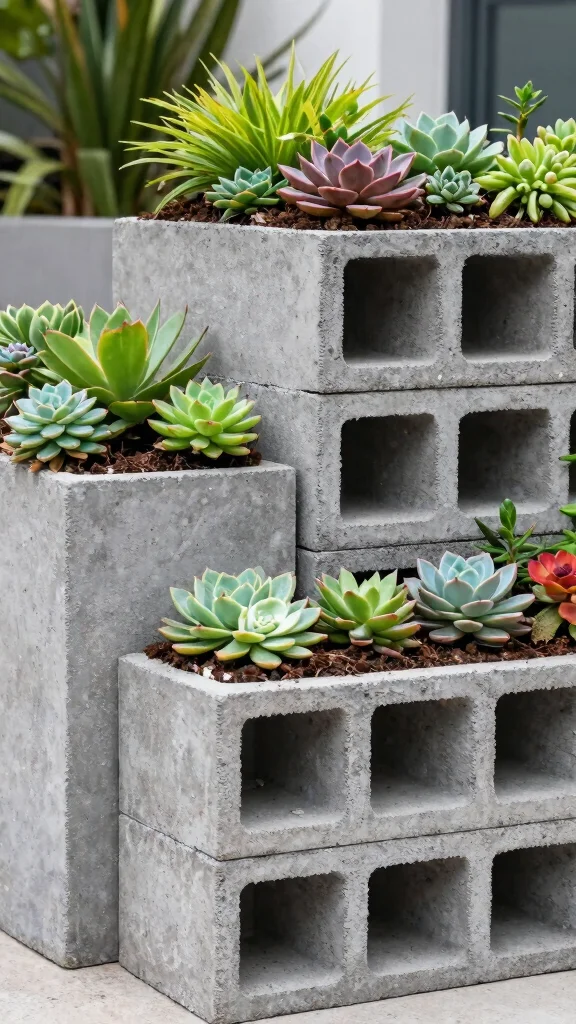
Explore the modern appeal of concrete block planters that blend style and durability. These blocks offer a sleek, contemporary look while allowing for creative planting arrangements. Whether you choose to paint them or leave them in their natural gray, concrete blocks can be arranged in various configurations, making them a versatile option for any garden. Use the open sections for planting or stack them for height variation, creating a stunning display for succulents or herbs that thrive in well-drained conditions.
To implement this design, visit local home improvement stores for concrete blocks, which are often budget-friendly. Incorporating this planter aligns with current trends in modern gardening, allowing you to showcase your creativity while enjoying the benefits of gardening.
Consider these steps when creating your concrete block planter:
– Arrange blocks in your desired layout for planting
– Fill open sections with quality soil and select your plants
– Optionally paint the blocks for added personality
– Ensure proper drainage for healthy growth
This concrete block planter not only adds a modern touch to your garden but also enhances the overall aesthetic with its clean lines and striking materials.
8. The Hanging Planter

If floor space is limited, a hanging planter can be a stylish solution for your gardening needs. These planters can be suspended from ceilings or walls, creating a floating garden effect that adds dimension to your space. Whether you choose macrame hangers, repurposed containers, or simple shelves, hanging planters are perfect for trailing plants like string of pearls or pothos. This design not only looks appealing but also encourages creativity in how you display your plants.
To create your hanging planter, consider sourcing materials from thrift stores or craft shops. If you’re on a budget, DIY options like macrame or using simple hooks can be both fun and affordable. This trend of vertical gardening allows you to maximize space while adding a unique touch to your decor.
Here are some actionable tips for your hanging planter:
– Choose sturdy hooks or supports to hold the weight
– Fill containers with soil and plant your selections
– Secure them in a spot that receives adequate sunlight
– Mix different lengths and types of plants for a dynamic look
This hanging planter not only enhances your gardening experience but also adds a playful element and visual interest to your space.
9. The Decorative Fence Planter
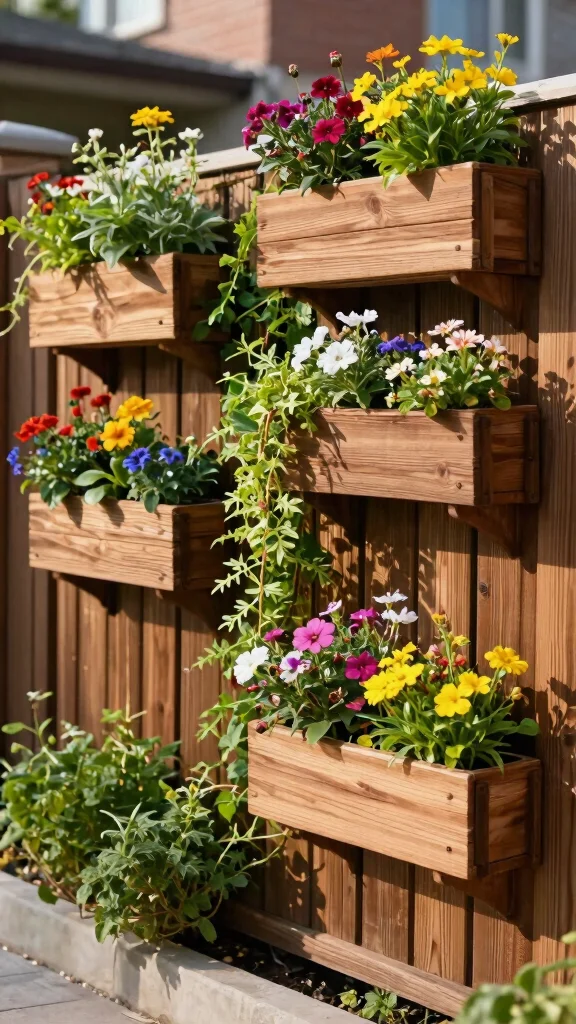
Transform your fence into a planting paradise with decorative fence planters that seamlessly integrate into your outdoor decor. These planters can be attached directly to your fence, creating a beautiful display of trailing vines, herbs, or flowers that soften the harsh lines of any fence. Opt for wooden designs that complement the structure or colorful pots that add a pop of interest. This project maximizes planting space while enhancing your garden’s aesthetic appeal.
To create your decorative fence planter, select sturdy planters that can withstand outdoor conditions. Sourcing materials from local garden centers or home improvement stores can make this project budget-friendly. This design trend ties into the growing interest in vertical gardening and outdoor beautification, allowing you to express your gardening creativity.
Consider these steps to create your decorative fence planter:
– Use brackets or screws for secure attachment
– Fill planters with soil and select vibrant plants
– Water as needed, ensuring proper drainage
– Incorporate plants that cascade beautifully for a softer touch
This decorative fence planter not only enhances your outdoor space but also adds charm and character with its integrated design.
10. The DIY Green Wall
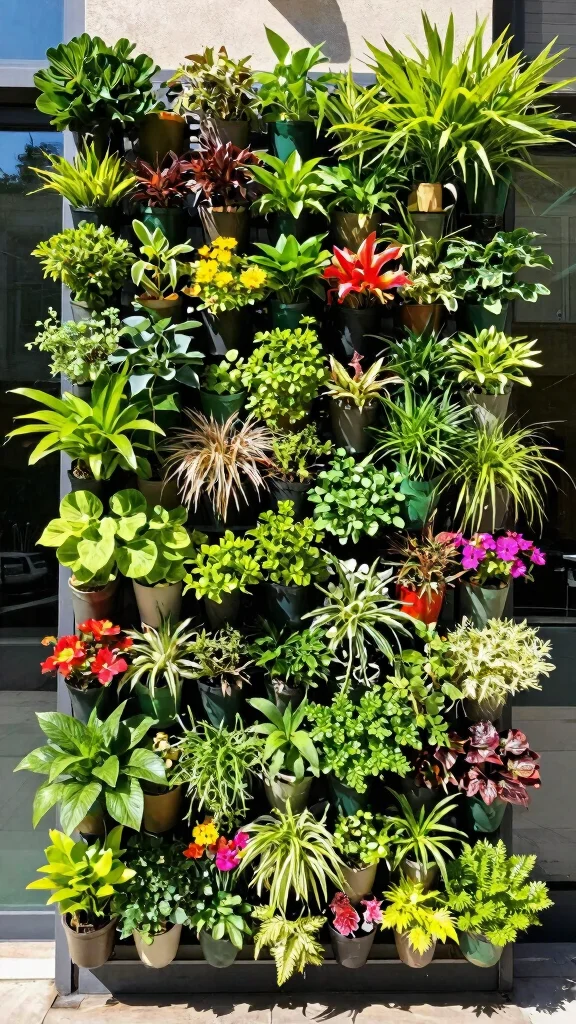
Bring life to your outdoor setting with a DIY green wall that transforms a plain wall into a lush vertical garden. This project allows you to mix small planters or pocket planter systems to create a vibrant display of herbs, flowers, and even small vegetables. It’s an ideal solution for urban spaces with limited floor area, encouraging you to embrace nature in a compact form. You can utilize recycled materials or purchase modular kits for a polished finish.
To implement your green wall, look for small planters at garden centers or online marketplaces. This DIY approach aligns with sustainable gardening trends, allowing you to cultivate your own plants while enhancing your living space.
Here are some actionable steps for your DIY green wall:
– Determine the layout for your planters on the wall
– Secure pots with screws or brackets for stability
– Fill with soil and plant your selections, ensuring proper spacing
– Water regularly to maintain your green display
This DIY green wall not only adds a stunning visual element to your outdoor area but also enhances the overall experience with its rich textures and vibrant colors.
Fun fact: A compact 4×6 ft vertical planter wall can grow up to 20 herbs and greens in a small urban space. That transforms a blank wall into a lush, usable garden—no floor footprint required.
11. The Garden Bench Planter
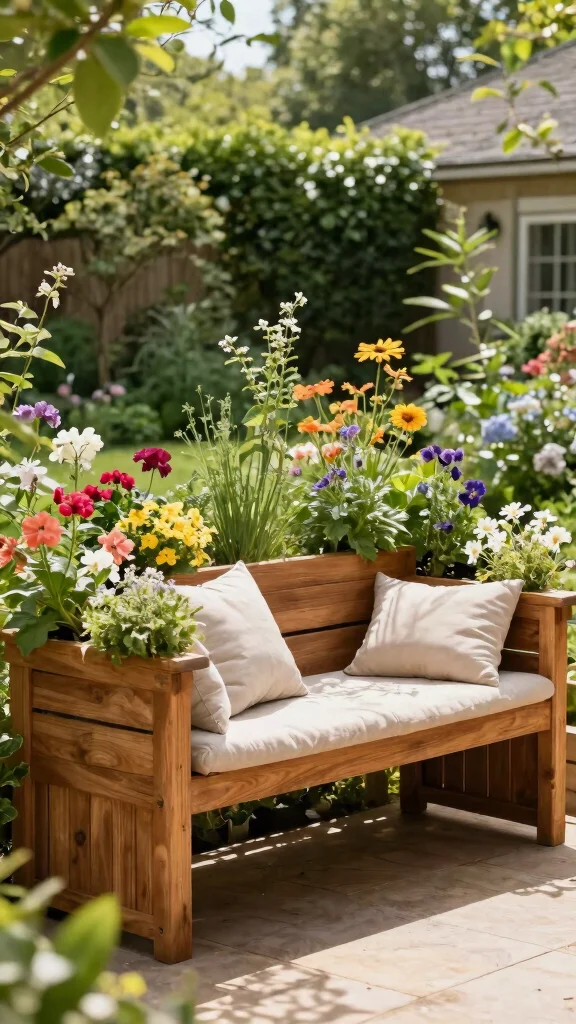
Combine functionality and style with a garden bench planter that serves as both seating and a plant display. This multi-purpose piece is perfect for outdoor entertaining, providing ample space for plants while offering a comfortable spot to relax. Build a sturdy bench with integrated planter boxes that can be filled with vibrant flowers and aromatic herbs. Choose weather-resistant materials to ensure it withstands the elements while looking chic.
To create this garden bench planter, source pressure-treated wood from local suppliers. This project aligns with the trend of multi-functional outdoor furniture, allowing you to maximize your space while enjoying the beauty of your plants.
Here are some practical steps for your garden bench planter:
– Construct a robust frame to support weight
– Secure planter boxes to the ends or back of the bench
– Sand down rough edges and apply a weatherproof finish
– Fill planters with soil and select your favorite plants
This garden bench planter not only enhances your outdoor experience but also adds charm and beauty to your space with its unique combination of seating and greenery.
12. The Circular Planter Box

A circular planter box serves as a stunning focal point in your garden, inviting a sense of flow and creativity. This design can be constructed from wood or stone to create a unique aesthetic that draws the eye. Ideal for feature plants or a collection of herbs and flowers, a circular planter allows for natural overflow, creating a lush and vibrant display. Position it in your garden or patio to enhance the inviting atmosphere.
To create your circular planter, gather materials from local suppliers or salvage yards. This project ties into the trend of unique garden shapes and layouts, inviting you to explore different planting styles.
Here are some steps to create your circular planter box:
– Determine the size and gather materials for a stable base
– Fill with quality soil and arrange plants in a circular pattern
– Water regularly and maintain your vibrant display
– Utilize a drip tray at the bottom for easier maintenance
This circular planter box not only adds a striking element to your garden but also enhances the overall experience with its lush greenery and inviting design.
13. The Rustic Wood Planter
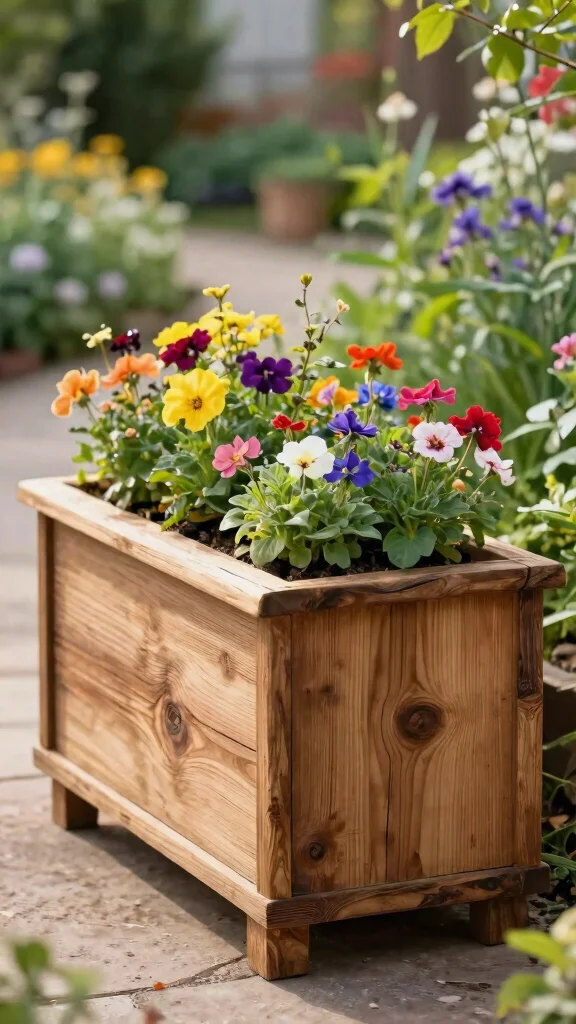
A rustic wood planter brings timeless charm to any outdoor space, perfectly blending functionality and aesthetics. Crafted from reclaimed wood, this design not only enhances your garden but also promotes sustainability. The natural imperfections of reclaimed wood add character, making each planter unique. Use deep rectangular designs for larger plants or smaller boxes for herbs, allowing this versatile planter to fit seamlessly into any garden style.
To create your rustic wood planter, source reclaimed wood from local suppliers or salvage yards. This project aligns with the increasing trend in eco-friendly gardening, allowing you to cultivate plants while reducing waste.
Here are some actionable steps for your rustic wood planter:
– Cut the wood to your desired size and shape
– Assemble with screws to ensure sturdiness
– Sand down rough edges for a smooth finish
– Apply an outdoor finish for protection against the elements
This rustic wood planter not only adds beauty to your outdoor space but also enhances the overall ambiance with its warm textures and natural materials.
14. The Modern Geometric Planter
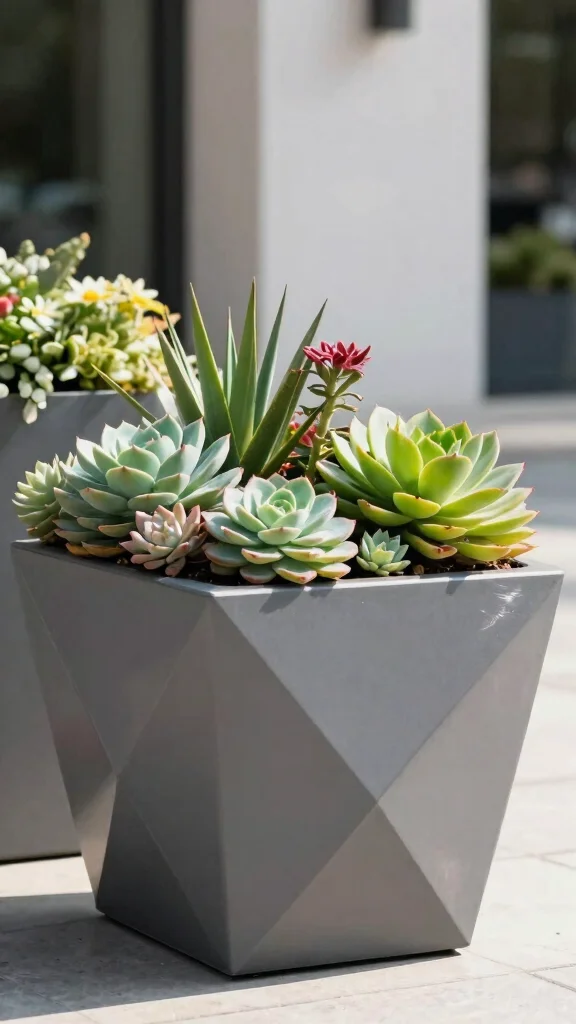
For a sleek and contemporary look, a modern geometric planter is the ideal choice. These planters feature unique shapes like triangles, hexagons, or sculptural forms, adding a striking visual effect to your garden. You can use materials like concrete, metal, or wood to create a stylish and artistic flair that complements modern decor. Fill them with striking succulents or colorful flowers to enhance the contrast and visual appeal, transforming any dull corner into a chic focal point.
To implement this design, gather materials from local craft stores or online retailers. This project aligns with current gardening trends that embrace clean lines and innovative shapes, allowing you to express your creativity while beautifying your space.
Consider these steps for your modern geometric planter:
– Choose your desired geometric shape and gather materials
– Construct or purchase the planter in the specified shape
– Fill with soil and arrange your favorite plants
– Position in a sunny spot to enhance your garden design
This modern geometric planter not only adds a stylish touch to your outdoor space but also enhances the overall aesthetic with its unique forms and vibrant greenery.
Did you know geometric planters can add 40% more visual impact to a tiny balcony? Triangles and hexagons turn vertical space into a sculptural focal point—perfect for planter box plans. Build with concrete or wood and plant succulents for instant, chic style.
Conclusion
Crafting your own planter boxes is not only a rewarding DIY project but also a fantastic way to personalize your garden space.
From vertical gardens to charming rustic designs, these 14 planter box plans cater to various tastes and urban spaces. Embrace the creativity that comes with designing your own pieces, and remember that each planter tells a story. So, start gathering those materials, channel your inner designer, and let your garden reflect your unique style. Happy planting!
Note: We aim to provide accurate product links, but some may occasionally expire or become unavailable. If this happens, please search directly on Amazon for the product or a suitable alternative.
This post contains Amazon affiliate links, meaning we may earn a small commission if you purchase through our links, at no extra cost to you.
Frequently Asked Questions
What Are the Best Beginner-Friendly Planter Box Plans for Small Urban Spaces?
These beginner-friendly planter box plans are perfect for small urban spaces and first-time builders. Start with a simple box (roughly 24x12x12 inches) using rot-resistant wood like cedar or exterior plywood, and line the inside to protect the wood. Assemble with exterior screws and corner brackets, then sand and seal with an exterior finish to weather-proof it. Drill drainage holes and add a removable liner for easy soil changes. Look for wooden planter designs that fit your space and build a cohesive row or corner to boost your outdoor decor ideas while staying true to sustainable gardening solutions and planter box plans.
How Can I Install Vertical Planter Boxes on a Balcony Without Leaks?
To install vertical planter boxes on a balcony, choose modular plans that fit railings or a wall, and use railing brackets or a freestanding frame. Add a waterproof tray below to catch overflow, drill drainage holes, and line interiors with a plastic liner to protect the wood. Seal the exterior and consider a light drip irrigation to minimize runoff. This setup turns a tight space into a stylish, functional piece of outdoor decor ideas with practical planter box plans.
What Tools and Materials Do I Need for These Planter Box Plans, and How Do I Choose Durable Wood?
Here’s a quick toolkit for these planter box plans. Tools: measuring tape, handsaw or miter box, drill with bits, wood screws, clamps, sandpaper, and a utility knife. Materials: exterior-grade wood (like cedar or redwood) or exterior plywood, a waterproof liner, weed barrier, drainage screens, sealer or stain, and hardware for brackets. If you want long-lasting results, pick wooden planter designs that resist rot and fit your climate. This is classic DIY planter boxes planning and a smart step toward sustainable gardening solutions.
How Do I Weatherproof and Maintain Wooden Planter Boxes for Long Life?
Maintenance is key to lasting planter boxes. Apply a weatherproof sealant or stain to cedar or redwood, and line the interior with a plastic liner to keep moisture away from the wood. Keep drainage holes clear, re-seal every season or two, and replace any boards showing rot. If you prefer sustainable options, consider reclaimed wood or durable composites for future updates. Regular checks let your planter box plans stay sturdy as part of sustainable gardening solutions.
Can These Planter Box Plans Be Used for Growing Herbs and Vegetables, and How Should I Arrange Plants in Vertical Layouts?
Absolutely—these plans are great for growing herbs and vegetables. For vertical layouts, place shallow-rooted herbs (parsley, chives) on the top shelves and deeper containers for greens or tomatoes on the lower levels. Aim for at least 6-8 inches of soil for herbs and 12-18 inches for vegetables, with good drainage and sun exposure. Mix colors and textures to create engaging outdoor decor ideas while keeping everything accessible for harvest. With the planter box plans, you can tailor spacing and plant groupings to fit your edible goals in any small space.
Related Topics
planter box plans
DIY planter boxes
small urban gardens
wooden planter designs
vertical gardening
sustainable gardening
outdoor decor
easy gardening projects
beginner friendly
space-saving solutions
urban gardening tips
creative planters